An indicator/criteria can have several custom
fields which you can create to add information about your indicators/criteria.
These indicators/criteria custom fields can also be used to help you achieve
your desired Welphi questionnaire design as tools to implement the overall
follow and layout of your questionnaire, and to make information available to
your Welphi panel of respondents.
Well, you may be asking: But how? Following is
introduced a simple step-by-step guide on how you can use custom fields to help
implement your desired Welphi questionnaire design!
1|Creat
your custom fields: You should create your custom fields before you create
any indicator/criteria. To add a field, go to the Indicators’ page, click the “ADD/EDIT
COSTUM INDACATOR FIELD” button and then the “create indicators field” button. Each
field must have a name and can have a description.
2|Select
and customize your custom fields to get your desired Welphi questionnaire
design. A custom field can be used to:
2.1| Group
indicators, making each different group to appear in a different page in your Welphi
questionnaire. To do this choose the “Group all the indicators with the
same value in this field. Each group will appear in a separate page.” when
adding or editing your indicators field. The design achieved by this action is
as shown in the screen featured in Figure 1, below.
Figure 1 - Welphi screen, displaying groups of indicators appearing in different pages of a Welphi
questionnaire.
2.2|Subgroup indicators, creating different sections in each group page of
your Welphi questionnaire. To do this choose the “Subgroup all the
indicators with the same value in this field. Each subgroup will appear in a
separate section.” when adding or editing your indicators field. The design
achieved by this action is as shown in the screen featured in Figure 2, below.
 Figure 2 - Welphi screen, displaying subgrouped indicators appearing in different sections on the same page of a Welphi questionnaire.
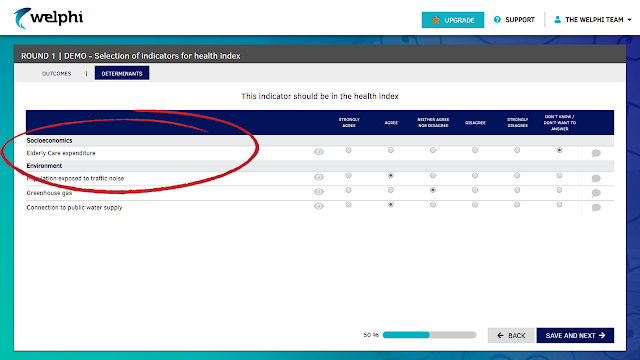
2.3|Make information available on your indicator/criterion. If you
don’t want to use the field values to group indicators, select the option “Don’t
use this field to group indicators”. By doing this you will not be grouping or
subgrouping your indicators/criterion as explained above in 2.1 and 2.2.. You
will however be adding information to your Welphi questionnaire that you deem
as valuable or even essential, to help your panel of respondents to provide their
answers in a more informed way. You can input whichever information you see
fit. For instance, you can make available tp the participants in the process descriptions
of your indicators/criterion or scientific information on them. Information
added to this custom field while be displayed on the Welphi questionnaire screen
provided the respondents click the “EYE” button highlighted in the screen
bellow (Figure 3).
Note that in order to belong to the same group
or subgroup, a set of indicators must have the same value in the selected field
and that you can only select one field to group indicators and one field to or
sub-group them in each process.
Every field can be edited later in the process
by clicking the field’s name in the costum indicators field page. You can also
add new fields if you want to. After creating the desired field, you can add
the indicators adding values to its fields.
For more on
this topic watch our video on how to add indicators on our support page at http://support.welphi.com/article/add-indicators/!


No comments:
Post a Comment